ICM Final Project


I wanted to do a joint project with ICM and PComp that blended an escape-room style puzzle with some fun animation. I hoped that I would be able to build an example of a small piece that could be installed in a larger walk-through experience.

The puzzle begins when the user sees a friendly creature trapped in a cave. Through a written-out message, the user is prompted to squeeze the creature’s feet in the correct order to solve the puzzle. Through trial and error, the user can find a method to find the right order for the feet, at which point the creature leaps up out of the monitor it had been displayed on and into the background.

The code for the project was written in Processing, which triggered two videos to be sent to Isadora using the Syphon plugin.

ICM Final Project Proposal

I recently put together a proposal for a fairly complicated installment in an escape-room style walk-through theatrical show.


It’s not practical to think about all of it for this project, but I wanted to see if I could simulate a small piece of it here. I’m hoping to create a panel of buttons that will constitute my installation’s input. The installation will have two outputs, one based in a screen, and one coming out of a projector. When the correct input is entered, an animated character that I’m putting together for my Comm Lab class will crawl up out of the screen and onto the wall behind the screen


IMG_0466 copy.jpg
56441738242__69CF4B39-935F-44DD-85D3-B5B247AA0F0A.jpg
 

If I have time, I would also like to make the creature jump out from one wall and land on the wall behind the user.


I’m merging this project with my PComp final. There’s obviously a fair amount of physical computing going on here, and there will be a fair amount of software coding as well. The videos involved in this project will be pre-recorded, they will be triggered using Processing, and they will be fed to the displays through Syphon and MadMapper.

As of right now, I feel like this should be an achievable and exciting project. I’m hoping it all comes together in time!

Week 8 Documentation

Sometimes simple can be tough.

I had a bit of a tough time getting my API project to work last week. So this week I figured I would do the most basic version of last week’s API project, and combine it with the simplest version of this week’s assignment – modifying a pre-loaded image.So, first things first, making the API work.

Step by step following the coding train, I built up a p5 page, and I accessed the API for openweathermaps.org.


I got it working to the point where it displayed the temperature given a us ZIP code hard-coded into the program. The goal was ultimately to be able to manipulate a photo to be either more blue or more red given the value of a city’s temperature in Fahrenheit. I felt like I was off to a good start, I just needed to add in the right html code to be able to let the user type in their ZIP code on the web page.

Then my code broke.

I don’t know exactly what happened, but, while I was able to get Javascript to recognize the code typed into the field defined in HTML, I lost all access to the Open Weather Maps API. I scoured the Coding Train videos again looking for what had gone wrong, but I couldn’t get it to work. At this point, I needed to work on other projects, so I had to set this aside for a couple days.

My project was only saved when somebody on the floor showed me a similar project created for the answer to a quiz question created by another ITP student. That code had fixed whatever problem I was having, and was able to print out the temperature from a given city in the browser’s console. I don’t know what the difference was between the code that I wrote and the code that I copied, but the new code worked. Next week I’ll have to look more closely at what I did wrong.

Now all that was left to do was create some modifications to concepts we had covered in class. I set up a for loop to pixelate a picture of my dog

 
Because of course.

Because of course.


If the temperature is warm, she shows up as red, and her circular pixels are large.


If the temperature is cold, the pixels are small and blue.


Screen Shot 2018-11-05 at 11.08.43 PM.png
 

And if medium, she’s a little purple-ish.


Whew. It’s not the most awe-inspiring bit of code I’ve ever written, but the dang thing works, and I’m counting that as a success.

Week 5-6 Documentation

Two of the things that I had tried to do in the past couple weeks– creating a button to randomly generate an object within certain parameters, and creating a class of slider that could be simply copied and pasted into different projects, had proven to be more difficult than I had imagined at the time, and I wound up submitting projects that I wasn’t quite happy with. Given our past two lessons on object-oriented programming, though, I feel like I can take care of both of those concepts in one fell swoop.

I have been meaning to play with Beziers for a while for pComp, so that seemed like a good place to start. For my object class, I would make my own custom Bezier Class complete with moveable handles. Which, although complicated, was something totally manageable.

This code generated a Bezier with random starting and ending points. It takes parameters for the starting and ending points, and then generates two lines as handles based on the points that define the Bezier curve. Importantly, this process was easily repeatable.

 
Screen Shot 2018-10-13 at 1.28.12 PM.png
 

Great, custom object class with grabbable handles: check.

Now for the second half of my checklist; randomly generating an object with a button click. I created a new sketch within the file structure of my CustomBezier class, and drew a square with a certain number of custom Beziers attached to random spots on the sides.


This is where I deviated from the assignment a little bit.

The assignment was to create an array with an object class inside of it, and to add more objects by pushing a new object into the array. I couldn’t quite get that process to work with my custom Beziers, so I had to find a work-around. I used a for loop in the setup function to define one hundred Bezier curves in the setup.

 
Screen Shot 2018-10-13 at 1.37.58 PM.png
 

The number of curves that are actually displayed was determined by a variable called “bezierNumber”, which at the outset is defined as zero. I wrote an add button to let the user add curves, which really just reveals one of the curves already written by the for loop. It might be cheating a little, but I felt like I had a solid enough grasp of the push method from the quizzes that I didn’t feel too guilty about it. You can only make up to a hundred Beziers this way, but by that point the sketch will be so sluggish and convoluted anyway that I doubt many people would want to.

I was a little worried that users might just see the curves as a weird design rather than something that can actually interact, so I added a bit of text after the third curve pops up to prompt people to play a little with the handles.

I added a clear box to reset the whole sketch and I was about ready to call it a day when I noticed an annoying feature.

If you’re hovering over two handles at the same time when you click, the two handles instantly snap together and become impossible to separate. I considered writing some extra code to make it impossible to select two handles at the same time, but I found it oddly satisfying to drag all the curves around together like a big floppy spider web.

So I decided to turn a bug into a feature. I added a little extra text to pop up after six curves are generated, and I changed the name of the project to Bezier Net.

It’s a game now. Maybe a pointless game, but it’s one that I can’t stop playing.

Week 4 Documentation

Since this week’s project was to re-organize code into a better system creating a cleaner workflow, I thought this would be a good week to start coding in an entirely new IDE as well. I had been meaning to find some sort of third-party program to do my coding in for a while now, largely because I sometimes like to go offline when I’m doing coding work. I noticed that Daniel had started using Atom in some of his newer vids, so Atom looked like a good option.


I was delighted to find that Atom was a free download with an active community supporting it. After a while of googling and searching the best way to use it, I got it working so that I could view my code on a local server with Firefox.

While I was working on my quiz this week, a small mistake that I had made seemed oddly appealing.

 
Screen Shot 2018-09-30 at 1.09.14 AM.png
 

I had accidentally deleted the background, causing my bouncing balls to leave a colorful trail in their wake. I had already decided that I wanted to combine my test slider from last week into a single class that could be easily copy-pasted into another project, so I decided that for my week four project I would use two sliders created from the same class template to control the speed of these ellipses as they left a rainbow trail around the screen.

Well, as is often the case in coding, that task turned out to be more complicated than I had thought it would be. Replacing what I had created for the original slider test wasn’t quite the easy copy-paste job that I had hoped.


While I did eventually get them working, they don’t quite work as well as the original did. My last slider had a function that kept the “sliderMoving” Boolean active until the mouse was released, which meant that you wouldn’t lose control of your slider if your mouse just accidentally slipped off of it. It sounds like a small thing, but it really made a difference in functionality.

Additionally, I couldn’t get changes to variables within the class itself to affect anything in the draw function, which meant that I couldn’t get them to affect the speed of the rainbow bouncing balls. The ellipses that I ultimately used to demonstrate that the sliders were working were written into the slider classes themselves.


Screen Shot 2018-10-01 at 7.49.24 PM.png
 

I think it’s important to mention my shortcomings on this project, because this is something I’d really like to come back to. A slider class is something that I can imagine coming in handy on any number of projects, so fixing this at some point would be a really worthwhile thing to do.

Week Three Documentation

Dana and I met up on Thursday to plan out what we were going to create for our collaborative sketch. We decided to create a control panel on the left third of the screen with a human face filling out the rest. On the control panel, we would create four interfaces that could change aspects of the screen. We wanted to change the image’s mouth from happy to sad, we would create a slider to change the length of the nose, a button to generate freckles randomly in a fixed zone across the face’s cheeks, and a button to set the eyes into “Disco Mode,” which would make them behave in erratic ways. For division of labor, Dana would tackle the eyes and the smile, and I would do the nose slider and the freckle generator. We got to work with plans to meet up on Sunday.

I started with what I assumed would be the more difficult of my two tasks, which was to create a slider. I knew that I needed it to move between a range along the y-axis that aligned with a visible line, I knew that I needed it to become “active” when the mouse hovered over it, and I knew that, once clicked, it would need to move along that axis along with the mouse. I used “if” statements with the mouse position to activate the slider, and a “mouseIsPressed” if statement to make the sliders y position align with that of the mouse, and a couple more if statements to stop the slider at the top and bottom end of the line, with a “mouseReleased” event to let the slider go. I then hooked up a variable to the size of an ellipse as a way to test this new slider that I had written.

Screen Shot 2018-09-24 at 10.47.38 PM.png
Screen Shot 2018-09-24 at 10.47.29 PM.png

Great, this is all going pretty smoothly so far. Interestingly, when I met up with Dana on Sunday, I saw that she had a completely different method for making her own slider. Once her slider was activated, it tracked the change in the mouse position (as opposed to just mouseX or mouseY), and used a constrain command that I didn’t know about to keep it on its track. It was kind of fun seeing a different way of accomplishing the same thing.

The second task, that of creating a button that, when pressed, would generate a freckle in a random location, was where I got stuck. I knew kind of how the mousePressed event worked (as opposed to the mouseIsPressed conditional statement that I used for the slider), but it took me a long time of playing with it and combing through the Coding Train videos to get to a point where I could actually use it effectively. I don’t know why this one was so much harder for me to get, but it just wasn’t clicking for me, so to speak. For really the first time in this class, I felt like I had hit a wall that I couldn’t get past.

By the time it was time to meet back up on Sunday, I had my working slider to control a variable that would eventually turn into our cartoon person’s nose, but I didn’t have anything for the freckle generator that we needed. After an hour of coding together, it became clear to me that I wasn’t getting anywhere with it. We decided that Dana would create her sketch first while I kept working on my problem, then send it over to me when she was done.

So I sat down and started watching some Coding Train. I feel like I learned a lot, but nothing that exactly would get me where I needed to go. I’m pretty sure that there’s a video just past where I got to in it that would have had what I needed, but I just ran out of time before I could really figure it out.

Screen Shot 2018-09-23 at 8.05.24 PM (2).png
Screen Shot 2018-09-23 at 8.05.24 PM.png

Dana sent me her part of the code on Sunday evening, and I got to work adding in my parts the next morning. I copied her code into a TextEditor file so I wouldn’t destroy it, then started carefully copying my code for my into the project.

 
Screen Shot 2018-09-24 at 9.52.34 AM.png
 

I copied everything in pieces, making sure that each piece still worked as I went along. I then took out the ellipse and attached the slider variables to the position of one vertex of the nose.


Looks pretty good. Then for the “Frecklifier,” instead of having the button create one additional freckle each time you hit it, it just has the ability to create one randomly placed freckle each time the code runs.

 
Screen Shot 2018-09-24 at 11.14.23 PM.png
 

Which I’m calling a moral victory. I think the actual solution for what I’m trying to do involves splicing an object into an array every time a button is pressed, which is a little past what I can do right now. Ultimately, the part of this that I thought would

Week Two Documentation

I was inspired by some of the more complex drawings I saw last week in class, and I really hoped to be able to push myself with what I could draw in code as well as the reactivity required for the assignment. I decided that this rough sketch could be a good starting point for something interesting.

 
DSC00259.JPG
 

So, I took some of the ideas for the original drawing and transferred them onto a grid.

 
DSC00265.JPG
 

Ok, that’s still a pretty complex thing to draw in code, but let’s see if I can do it. The eyes would follow the mouse as it tracked across the screen, and they would be looking at something new every time the code was run. I started by taking some of the connected arcs that I had used in my last project and started to draw a chin.

 
Screen Shot 2018-09-16 at 2.53.12 PM.png
 

That’s obviously not the most impressive thing in the world, but I would get back to it. I decided that I should probably figure out how the eyes would work before diving in too deep on the drawing.

So I started up a new sketch just to test out eyes. First I created a circle to serve as the socket, and a smaller circle to serve as the pupil. I created some conditional parameters so that if the mouse was directly over the eye, the pupil would follow under the mouse directly, otherwise I had the pupil follow the mouse on a scale that reflected the dimensions of the eye socket.

 
Screen Shot 2018-09-15 at 1.14.04 PM.png
 

Well, obviously that leaves something to be desired. Pupils don’t fly out of their sockets. So this pupil shouldn’t be bound in by a rectangle, it should be bound in by a circle. Time to bust out some good old-fashioned high school trigonometry.

 
DSC00267.JPG
 

After much staring in confusion at the unit circle I had just drawn, the formula I came up with was -

X = cos( tan-1 (Y / X) )

Y = sin( tan-1 (Y / X) )

Which looks simple now that I’m writing it but it took me the better part of a day to figure it out. Even then, it only worked with the mouse on one half of the screen, so I had to add in a conditional statement to reverse it whenever the mouse was on the other side.

By the time I got the eyeball thing working I had realized that I wasn’t going to be able to build this functionality and create a complex drawing in time, so I made the choice to cut my losses and focus on adding new things to the sketch I made last week.

First things first, replace my old eyes with the fancy new eyes I had just written.

 
Screen Shot 2018-09-16 at 12.58.18 PM.png
 

Obviously, there were some major kinks that needed to get worked out when transferring the new eyes to a new system. Additionally, when I first put the eyes in, her head didn’t move along with the eyes. It turns out that when a dog’s eyes follow you but her head remains completely still, the overall effect is a little unsettling. She’s not really playing with you so much as she’s creepily staring at you. So I realized that the head needed to move a little bit too as her eyes moved. And as long as we’re going down this road, I had her snout move a little more than the rest of her face to give her an illusion of three-dimensionality.

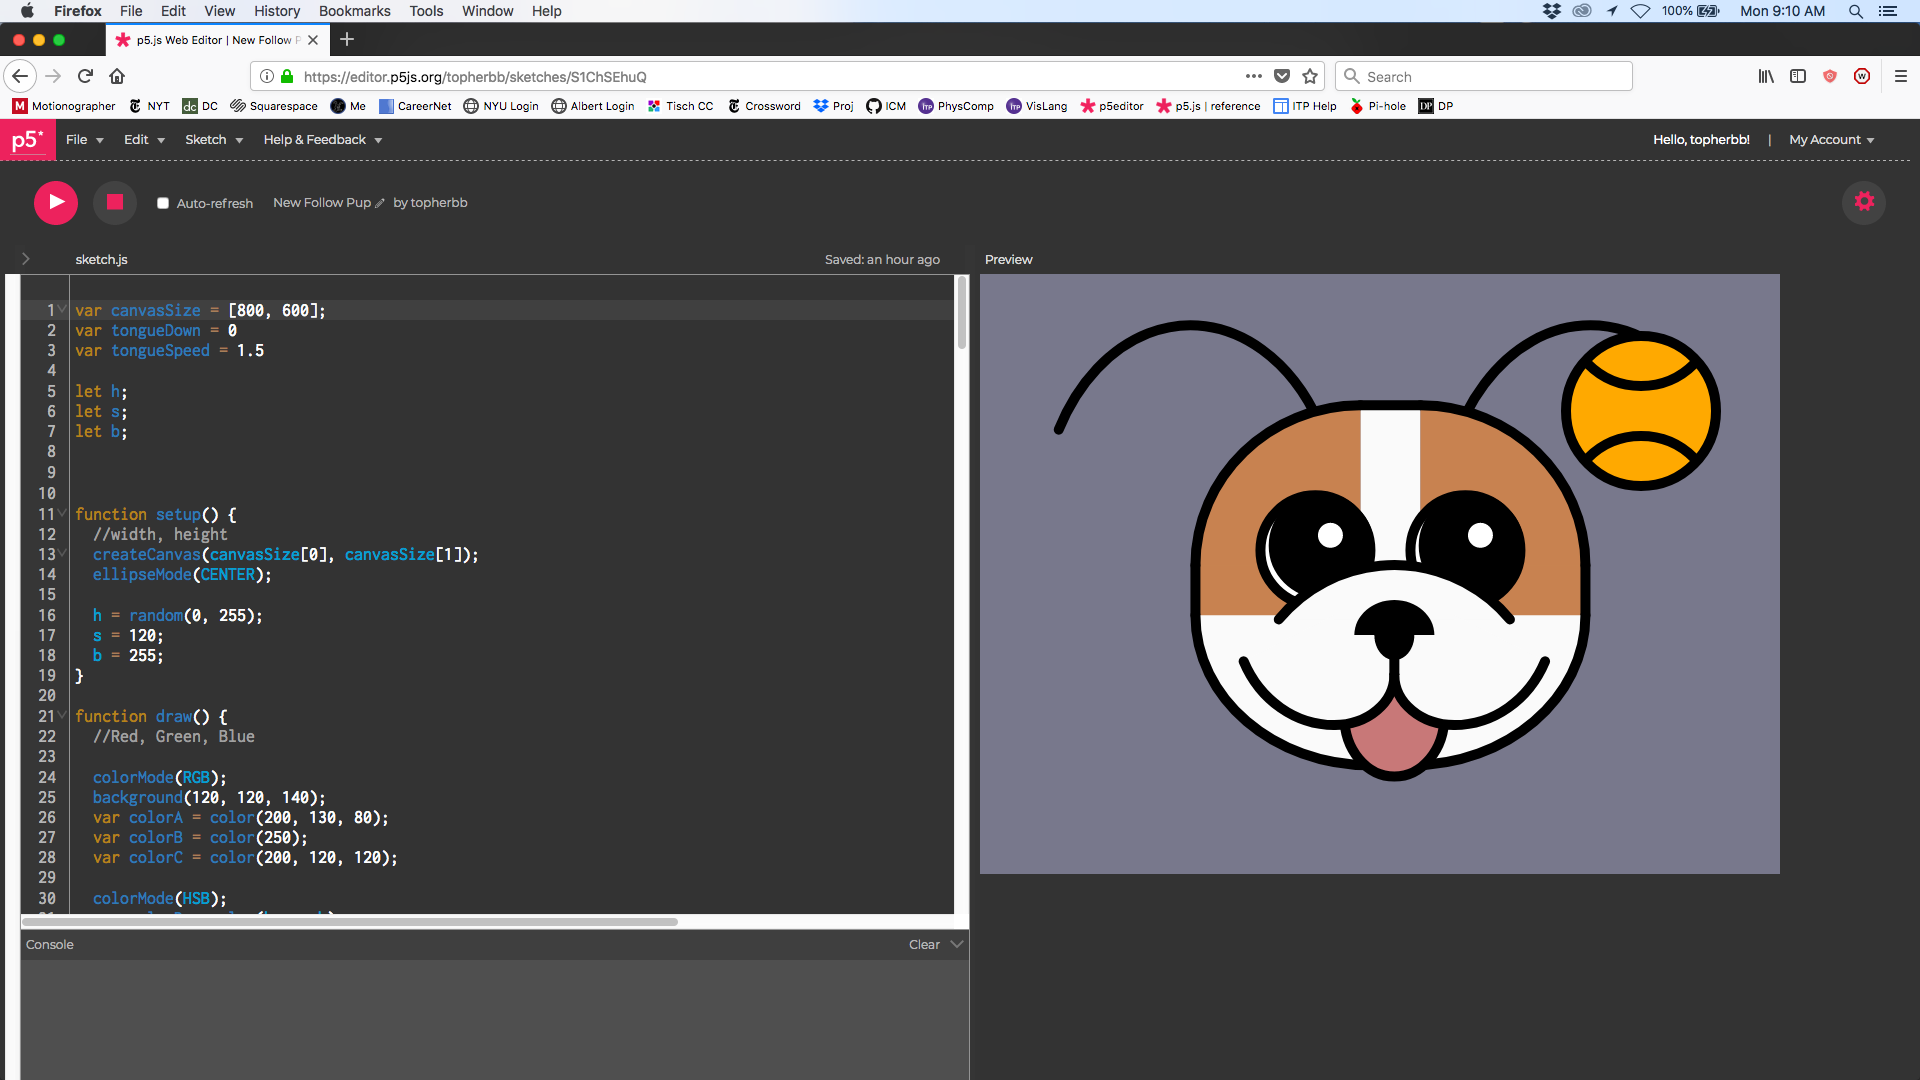
For final touches, I had her tongue drop down at the start of the program, and I made a ball follow the cursor whose hue value was randomly selected every time the program was run.

 
Screen Shot 2018-09-17 at 9.10.36 AM.png
 

Good dog.

Week One Documentation

I wanted to make something fairly simple and precise from a pre-existing sketch. I wound up creating something a bit more complex, and having plenty of fun in the process.

Here’s the sketch that I started with.

DSC00257.JPG

Here’s the subject that it’s based on.

IMG_0188 copy.jpg

I like my dog. Don’t judge me.

I wanted to make a series of lines and arcs, with pre-existing coordinates that would be simple to program. So I set off writing a few lines to roughly match up with the sketch.

Screen Shot 2018-09-06 at 10.06.30 AM.png

So far so good. But as I kept going, I found that I was having a hard time making it look right.

Screen Shot 2018-09-06 at 10.51.26 AM.png

This is around the point when I decided that the code needed to get a little more sophisticated. I have a little experience in coding from using expressions in After Effects.  I was delighted to find that a lot of the basic grammar transferred over pretty well. Specifically, the practice of using variables to be able to edit multiple things at the same time. If I attached the end of one line and the end of another line to a point called, say topLineX, then I could move that one point and have both points respond. That kind of interactivity  allowed me to get the picture looking the way I wanted much more easily than just assuming I could put in the right coordinates and everything would be fine.

Screen Shot 2018-09-06 at 12.35.04 PM.png

I easily changed the shape of the jaw by tethering the end point of two arcs to the end points of a single horizontal line between them. I allowed flexibility in eye position by defining their positions relative to a center point. And I anchored everything in the image to a single image called “topCenter.”

Screen Shot 2018-09-06 at 6.54.56 PM.png

Hm, the red on her face looks a little too bright. Maybe I should change “colorA” (which is linked to the fill of four different shapes in the image) to something a little more muted.

Screen Shot 2018-09-09 at 4.07.34 PM.png

That’s better. Now I wonder what she would look like if we narrowed her face a little? There’s a variable called “topArcWidth” that could do that.

Screen Shot 2018-09-09 at 4.14.29 PM.png

Woops! That’s one too many zeroes.

Screen Shot 2018-09-09 at 4.14.37 PM.png

Too narrow. Maybe adjust it back up a little?

Screen Shot 2018-09-09 at 4.14.51 PM.png

I think that looks pretty good.